Thursday, December 31, 2009

Spice Up That Magnet Board

Turn that old Magnet Board into something to talk about!

I had this Magnet Board hanging in my house-black-so I decided it needed some spicing up!

I just got scrapbook paper and cut it into strips and Mod Podged it on. It really is something to talk about now. I always get comments on it from guests!

The Magnet Board I purchased at Roberts Arts and Crafts.

Tuesday, December 29, 2009

{SNOWMAN}


I just finished this Snowman! He was so easy to make. All you need to do is cut out 3 half circles or squares at the dimension provided above nail them to a board up the center and to the base and you have a fun snowman to decorate! I used carpet tacks for the Eyes to make them stick out! I sanded the edges and added stain.
If anyone takes this project on I would love to see the finished product. Leave a Comment so send me an email if you have questions!

Monday, December 28, 2009

Plexiglass Frame!


I love Plexiglass frames, because the possibilities are endless. I just cut strips of paper, used spray adhesive to stick them down and put varnish over the top of the paper to make sure it doesn't rip or fall off!

Saturday, December 26, 2009

Old Window

I made this for my mom for Christmas. I was quite pleased with the end results.
I think I need one now!

Wednesday, December 23, 2009

Tuesday, December 22, 2009

It is SNOWING!!


It is snowing at my house so I thought it appropriate to post this fun door hanging!

He is so easy to make. Just round off his head add feet and ear muffs!

Monday, December 21, 2009

JOY/CAKE

I love these 2 inch letters from The Wood Connection. They cut them out and you finish them. I just finished mine! So fun!


I made this cake for my baby's first Birthday. Since this was my first time working with fondit I decided to make it a Dr Suess cake so it was supposed to be all crazy. I just bought my fondit from Walmart and followed the instructions in the box. Not too bad for a first time!

Sunday, December 20, 2009

Cards


Fun Christmas Cards from Just bee Scrap'n check out their web here

Saturday, December 19, 2009

Tags

FuN tags from Sister Stuff


F

Thursday, December 17, 2009

Blog Swap

MERRY CHRISTMAS from {Crafts and Deals}

I am so excited to be a guest blogger on Curly Q!! WOW is all I can say when it comes to her cute and fun ideas she posts about. I am excited to see what great ideas she comes up with next!!


Here is a fun, simple and cheap gift idea you could give to anyone...
I call it the secret gift...here is how it works.

You do a secret kind thing for someone in your family and leave the gift for them. When they find it they have 24 hours to give the gift away to someone else by doing a kind deed for them.


{This is what the tag says:}


This Christmas gift is a special one you see


It's been left for you secretly


It's not a gift that can be bought at the store


It's a gift that means so much more.


24 hours is all you have to give this gift away


Do a kind deed for someone without them knowing


Leave this present behind to keep the secret gift going.


Poinsettia Hair Flower

I put this on Crafts and Deals last week but thought I would share it again!

I made this fun Poinsettia Flower for my baby girl's hair and thought you would enjoy it too!


What you need:
4 Layers of a Poinsettia (any color you choose)
Tool
Ribbon
Bead (for center)
Alligator clip for the back
Hot glue gun
Glitter
Spray adhesive


First Layer: Cut tool into squares and criss cross over center. Hot glue down
Second Layer: Add second flower hot glue down. Criss Cross ribbon on top and hot glue down


Third layer: Add third flower Cut tool into squares and criss cross over center. Hot glue down

Fourth Layer glue down top flower glue in bead for center. Trim tool and ribbon to desired length and....


GLITTER AND ENJOY!


FUN, do it yourself Topiary's

I love topiary's this time of year. Here are a few cute ideas I have found....I better get started!

I found this on Diary of a Craftaholic Click Here for instructions
From Under the Table and Dreaming a fun different topiary Click here for instructions
Another HGTV favorite click here for instructions

Wednesday, December 16, 2009

Lollipop Center Piece


I found this fun LOLLIPOP center piece on HGTV. I love candy and center pieces...can't go wrong with this one! Click here for instructions and more great ideas


Here is my newest wood creation! He is so easy and fun to make.

Tuesday, December 15, 2009

Window REDO!!

001[1].JPG.jpg


I finally got my hands on an old window and was looking for ideas to refinish them....

Click HERE to see more old window redos by The Creative Crate

Monday, December 14, 2009

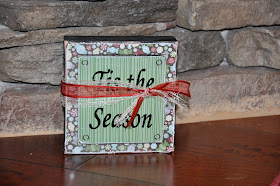
Fun Christmas Block


Need:
2x6 wood cut into a 6x6 square
1/4 plywood cut into 4x4 square
2 different pieces of scrapbook paper
Ribbon
Carpet Tacks for corners


Paint wood add paper sand and glue together.

Add your own charm. If you don't want vinyl you can print what you want from your computer!

Saturday, December 12, 2009


Vinyl SALE
First come first serve.
I have 4 of these vinyl sayings (board not included)

$7.00 (including shipping)


Email me @ curlyq.expressions@gmail.com

{Wreath}

So fun and so easy to make! I made this with my left over christmas balls! I didn't have Green and I wanted some so I glittered clear and gold balls!
copy and paste this link for instructions
http://www.eddieross.com/eddie_ross/2008/12/no-wire-hangers-well-maybe-just-one.html

Friday, December 11, 2009

Neighbor/Visiting Teaching Gifts


Fun, Easy 12 day of Christmas gift!

I put dots on my candle so they know how far to burn it each day!


A Scriptural

Twelve Days of

Christmas


Day

13th Isaiah 7:10-15, 21-22

14th Helaman 14:1-13

15th Luke 1:26-38

16th Luke 1:39-56

17th Matthew 1:18-25

18th 3 Nephi 1:1-9

19th Luke 2:1-5

20th 3 Nephi 1:10-21

21st Luke 2:6-7

Isaiah 9:6-7

22nd Luke 2:8-20

23rd Matthew 2:1-15

24th John 3:16-17


Thursday, December 10, 2009

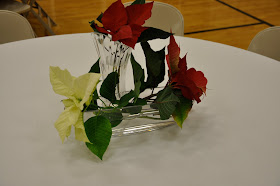
Center Pieces


I did these tonight for a Dinner! They turned out wonderful and are very cost effective. All you need as a poinsettia and glass!

Wednesday, December 9, 2009


As you may be gathering I LOVE 4 inch blocks!
Here is another simple Idea for 4 inch blocks.
I found the Santa head at Michaels!

Tuesday, December 8, 2009

Advent Calendar


I know I am a little slow on this...but hey it is done and Chirstmas isn't here yet!
I bought the magnet board at Roberts and cut 1/4 inch wood in 2x2 squares, which I painted black. I added scrapbook paper, vinyl letters, sanded the edges, applied magnets to the back and here it is! Heartland Paper also has cute templets and ideas for count downs, Click here to see them.

Monday, December 7, 2009

Garlands

I love Christmas for Garlands. I found this cute blog with instructions on creating your own fun Garland. http://notsorandomstuff.blogspot.com/2009/11/easy-christmas-garland.html

Sunday, December 6, 2009

Christmas Gifts


These are both so Easy and add personalization for your Christmas gifts this year.

I made this frame for about $4 per frame. I used 1 inch particle board and cut it down to size. The plexi Glass is 5x7 which can be bought at most glass stores and Home Depot. Drill your screw holes into the plexi glass first and then drill all the way through your wood. The screws I used are 6x32 - 1 you can find them and the nuts at Lowes, Home Depot, or any nut and bolt store. I added scrapbook paper to add a little flavor!


I acutally Made this frame but any flat frame will work, paint it, and add scrapbook paper. I used spray adhesive to apply the paper.

Thursday, December 3, 2009


I love this saying it reminds me of the true meaning of Christmas! All you need is a board, some paint, and vinyl! Easy and affordable. I do sell the vinyl if you would like to order some!

Wednesday, December 2, 2009


I love to craft, I needed some new ideas so I start searching Blogs, I found such cute ideas I have become addicted. So I decided to share some of the things I love to make and do. I hope you all enjoy.

I just finished this SNOW. He was so easy it took me all of an hour. I cut my blocks 4 in x 4 in. If you don't want to cut them craft stores often carry them. I painted my blocks red, let them dry, sanded the edges, stained them and applied the vinyl.
My snowman head is a snowball ornament I found at ROD WORKS. His mouth is just brads pressed into the ball with buttons for eyes and scrapbook paper for the nose.

So easy and fun!

ENJOY